Mago allows you to attach both static (files that don't change for every customer) and dynamic (files that DO change, like invoices, contracts or proposals) to every email sent through the system.
In this video, we demonstrate both how to generate and attach one-off files to individual emails as well as automating this entire process to automatically send files to your contacts as part of an automation routine or contact form response.
There are a variety of different ways to attach files to your emails in Mago, both static attachments that you might send every time (like a rider, a W-9, or a promotional flyer) to very complex documents that you might generate, convert into a pdf, and then attach to an email as part of an automation routine.
Let's look at the different ways to do this.
Attachments to One-off Emails
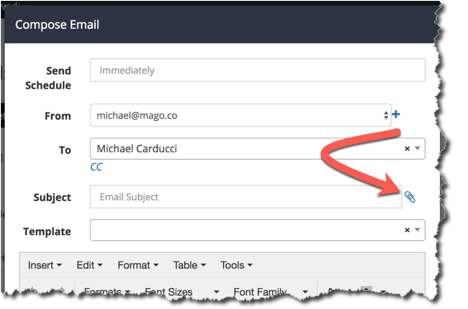
We will start with how to attach a file to a one-off email. Whenever you're composing an email inside of Mago, you can click the paperclip, and a file browser appears.
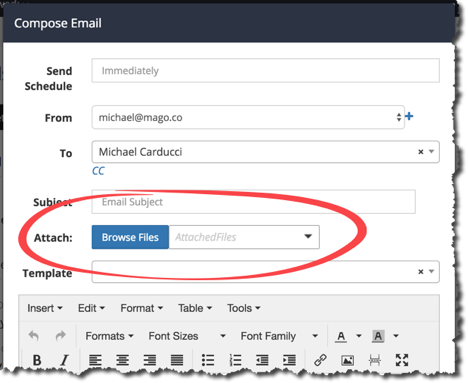
Click the "Browse" button to browse files. This takes you to your cloud storage which contains all the files you've uploaded. You can also upload additional files from your local machine into your cloud storage. These will be available in Mago anywhere you are, provided you have internet access.
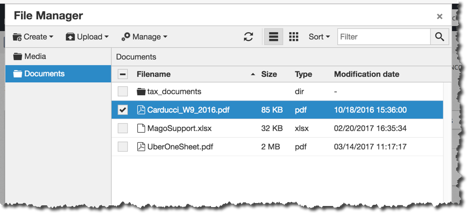
There are 3 folders that are visible if you're looking at the file manager from a gig record. The first file is media. This is typically where your images and videos go. These are shared across multiple gigs.
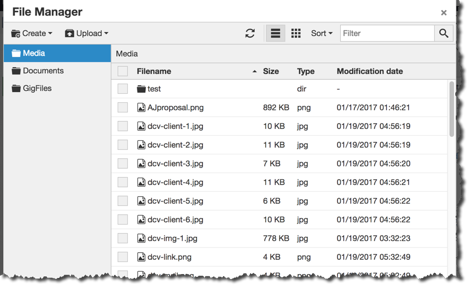
The second is documents. These are documents that don’t change like a W-9 or a flyer.
The third is the gig files folder. Every time you create a file within Mago using the generate document or the automation tools, Mago will put a copy of it in the gig files folder so you can access it again.
To attach files, select one or more files and click “Insert”
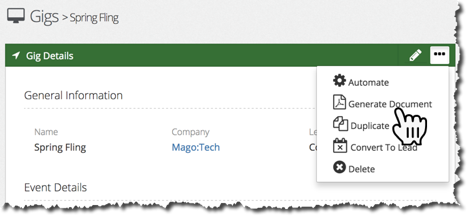
Let's look at another example of how to manually send a document that we have just generated.
Under the action menu for the gig or lead, select "generate document".
When you click the “generate document” button, a dialogue box appears with an editor, a filename, and a dropdown list of templates.
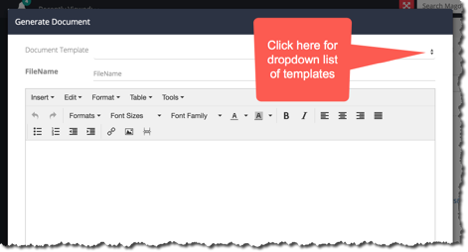
When you select a template, Mago will pull in the relevant details from the contact and the gig and populate the merge fields for you. Now your document is all ready to email or save as a pdf.
Once you’ve got your document ready, there are two ways you can go about sending it.
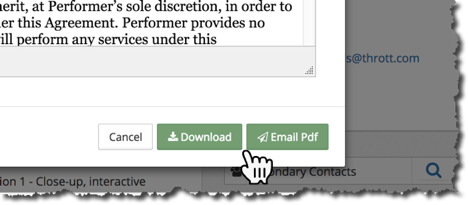
First, you can just click “Download.” This will allow you to save your document on your computer that you can later attach to an email.
If you want to save some time and get more out of Mago, you can use the “Email Pdf.” Mago will generate your document and bring up the email composition screen so you can compose your email right there without any extra clicks. You can write an email from scratch, or use an existing template. Putting those tools together will save you a lot of time.
Using Automation For Attachments
Now that you understand the basics of sending email attachments, it’s time to really harness the power of Mago and automate the process of sending emails with attachments. When you want to automatically generate and send dynamic documents, like invoices, that will be different for every gig or contact, you will use the following process:
From the Menu on the left side of the screen, select Automation, then click “Routines.” Select the routine you would like to automatically add an email with attachment to, and click the plus (+) symbol on the Routine Action Steps bar to add a step.
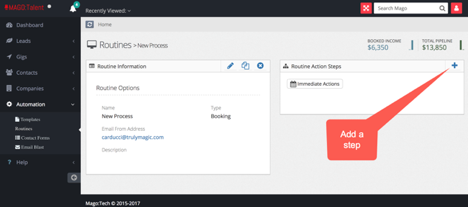
Select “Send Email” from the drop-down menu that appears.
Select the email template you would like to use for the body of the email, and the template for your attachment. You are able to select more than one attachment. Click “Next.”
Schedule your automation step to reflect the timing that you prefer, and click “Next.”
Click “Save” to save your new automation step. Mago will now pull the relevant data from the record, merge it into the templates you selected, generate the document, attach it to an email, and send it for you - without you having to copy and paste, hunt for information in the record, or spend a bunch of time making one-off emails for each gig.
If you want to just send a particular attachment that never changes every time you use a particular email, there is a process for that, as well.
For example, you may want to attach your W-9 every time you send out an invoice.
From the menu on the left side of the screen, select “Automation,” then click “Templates.” Select the email template that you always want your W-9 (in this example) attached to. In this case, you might select “Invoice Cover Letter.”
Click the plus sign on the “Attachments” bar on the right side of the screen.
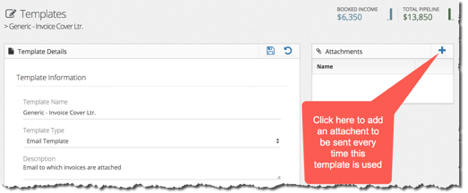
This will open your cloud storage and from there you can select which items you would like to attach.
Click “Insert.”
Now, that document will be automatically attached every time you use that particular template as part of a routine.
The only time, at present, that you won't see this getting pulled in is if you're doing a manual composition. When you're manually composing an email, you're given a little more control over what you want to attach or not attach because it's easy to make those discussions when you click compose. We don't pre-populate anything there so you can customize it.