Even though, as you become more familiar with Mago, a lot of your processes will be automated, it’s important to walk through the individual steps manually at least a couple of times. This gives you a better idea of what you want to automate, and what steps your own personal process actually consists of.
There will also be times when it just makes more sense to do a step manually rather than create a new routine around a single task.
Manually sending an invoice is very simple.
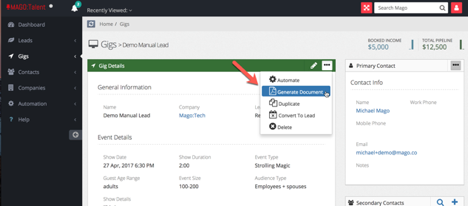
To send an invoice, open an event that has been converted into a gig. From the action menu, select “Generate document.”
This brings up an editor with a dropdown menu to select an existing template. In Mago, you’re provided with several example templates, including invoices.
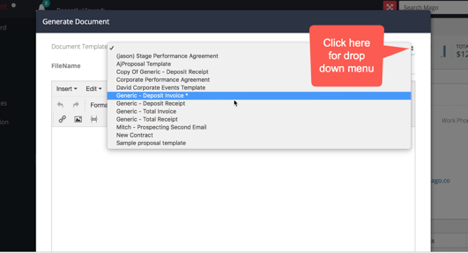
Once you’ve selected an invoice template, it appears in the editor and merges all the fields available. If a piece of information for a field is missing from the record, it will leave that space blank in the template. It’s always a good idea to look over your document to make sure all the fields are filled in properly.
If you have a blank spot that you want to fill, you can type the relevant into the document now. You can also add it to the record, but doing this will NOT cause it to appear in the document you just created. The merge process only happens once, as the template comes into the editor. So go ahead and type it in your document and then add it to the record so you have it next time.
Once you’re happy with your document, you can download it or email it right away.
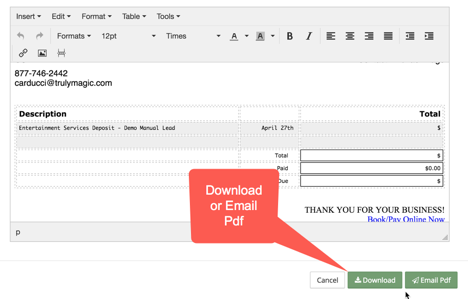
Click “Download” if you’d like to save it to your machine.Click “Email Pdf” if you would like to email it right away. This converts your file into a Pdf and opens the compose email window.
You can type an email from scratch here or you can use one of the many email templates Mago provides. In this case you would use the generic cover letter.

Again, as the template loads, it will merge in the appropriate fields. Look it over and if it’s ready to go, click “Send” and your invoice is on its way.
Sending a deposit/balance due invoice
If you would like to send a deposit invoice now and a balance invoice right before the show, create your deposit invoice using the process outlined above, and send it out immediately.
Then, create another invoice listing the balance due. Change the date to reflect the date the client will receive it, as well as any other changes you would like to make, and use the “send schedule” field to select the date and time you would like your email to be sent.